Sunday 23 September 2012

Memory card corrupted? – Easy fixes and solutions

Memory card corrupted? Don’t panic just yet! Often, while transferring data if the memory card is taken out or if the power is shut off, it tends to get corrupted and unusable. We’re going to tell you how to fix corrupted memory cards, using a few common solutions that could solve your problem. But keep in mind that completely destroyed or physically damaged memory cards cannot be fixed easily, neither can data recovery be done from them other than using professional data recovery solutions which can be really expensive. For situations where the memory card is not recognized or cannot be used due to incorrect formatting, here’s what you need to do!....


Memory Card Corrupted - The Problems

Problem 1 – Memory card can be read but not accessed

When you take out a memory card during data transfer, the file structure can get scrambled and ultimately, your device or PC might not be able to read any data from it. However, the actual data is still present in it. This memory card corrupted can be fixed by the doing the following:
  • Step 1 – Plug in the memory card via an adapter, card reader or any way you can to your computer.
  • Step 2 – Check if the memory card shows up in File Explorer, it most probably won’t be accessible but will have the right file system and everything. Note the drive letter path.
  • Step 3 – Open command prompt, preferably as Administrator and typed “chkdsk x: /r” without the quotes. Here, X is the drive letter of your memory card.
  • Step 4 – Let the process complete. If it asks to “convert lost chains to files”, type “y” for yes.
If only the file structure was damaged but not the files themselves, you will be able to get back all your files and use the memory card like normal again. Yep, the usually annoying CheckDisk tool can fix one memory card corrupted problem!

Problem 2 – Memory card shows invalid file system (RAW)

A corrupted memory card can also lose its file system and cannot be used because it’s not in a file system that Windows recognizes. The simplest solution for this memory card corrupted problem is a format. Here’s how you go about it:
  • Step 1 – Connect your memory card to PC via adapter/card reader.
  • Step 2 – Locate the removable storage media in file explorer, right click it and click “Format”.
  • Step 3 – Set the file system to “FAT”, not FAT32, NTFS, exFAT or anything else as most portable devices are compatible only with the FAT file system. Leave the allocation unit size as it is and uncheck “Quick format”.
  • Step 4 – Click format, let it finish and your memory card should be good as new!
Of course, formatting a memory card erases all data so make sure that you have a backup or you have recovered the data.

Problem 3 – Memory card cannot be read by PC

Even a problem like this one can be fixed quite easily by simply downloading updated drivers from your PC manufacturer. Always make sure you have the latest drivers and updates and if you’re running an assembled PC, grab the latest motherboard drivers.
There could be another problem as well. Newer cards are SDHC (high capacity) and are not readable on regular SD card readers. Make sure to get a SDHC card reader and updated drivers for it installed in your PC if you want to access the memory card on your PC. It’s the same case with the really high capacity SDXC (Extra capacity) cards.
If none of these are the cases, and even after the obligatory plugging in all ports doesn’t work, then do the following:
  • Step 1 – Insert the memory card into the card reader/adapter and plug it in to your PC.
  • Step 2 – Go to Device Manager via Control Panel and look for any devices that show up with a yellow exclamation mark (!).
  • Step 3 (a) – Right click the faulty device and try to automatically update drivers. If you are unable to, uninstall it, remove your device and restart computer. Alternatively, you could also right click and click “Scan for hardware changes” once it’s uninstalled.
  • Step 3 (b) – If your device still doesn’t show up, go to the “View” tab and click “Show hidden devices”. Now you might be able to see more faulty or greyed out devices. Right click, uninstall them and restart your computer with the device unplugged.
  • Step 4 – Once it’s booted up, plug it in again and it should be recognized.
Oh also, make sure that the little lock on the side of your memory card is not engaged.
The above steps will most probably get your memory card fixed, unless it’s completely damaged. Finally, if nothing works, the only solution is to buy a new memory card. Although, it would be a good idea to try and recover your data using a tool like Recuva. Leave us a comment and lets us know if you have any queries about fixing your corrupted memory card.

What To Do When System Hangs In Middle


The main problem we face regularly when we use a computer is: System hangs or freezes most of the times. Most of us will do a system reset or restart when system hangs because we dont have any other option. The main problem with this Reset is that you will loose all your unsaved work and some times data loss.To over come this problem i have few basic troubleshooting steps which can solve to bring the hanging system to normal state
First i have a simple trick: Keep on pressing the “Numlock” key until your operating system loads back to normal state. By doing this we can release the busy process. 
If this trick didn’t work for you then follow these basic steps to get your system to normal state.
1) Open the Windows Task Manager by pressing the “ctrl-alt-delete” keys. End the task in the processes tab which you feel is not required. You can observe all the programs shutting down in the taskbar one after the other, Then save if the problem is resolved. (All the programs are automatically saved even the Ms-word and other files.


2) If the problem is not solved even after the step 1 then may be some of the users are logged on the computer. Better use switch user in windows xp for the switch user page and then log off and log in so that all process will be restarted.


3) Better clean your History at least once in a week so that system speeds up->tools->internet options->clear history.


4) Delete all your internet temporary files ->tools->internet options->delete files


5) Delete cookies at least once a week ->tools->internet options->delete cookies


6) Remove and uninstall if you have unwanted programs which you haven’t use for longer this may slow up your system resources.
7) Defragment the drives atleast once in a week,right click on the desired drive and select tools and under that defragement now. 


8) Check the logical drive’s volume for errors, right click on the desired drive and select tools and under that check now.
9) Make sure you always shutdown your computer properly.


10) I will give a simply and traditional application for all windows operating system which keeps your system in good working condition.


Saturday 18 August 2012

How to Solve: Tricks & Solutions: Usb Device Not Recognized???

How to Solve: Tricks & Solutions: Usb Device Not Recognized???: This post is about the frequent problem occuring in our field...sometimes our USB's, Card Reader's,Bluetooth Doesn't Get Recognized by The ...

How to Solve: Tricks & Solutions: Usb Device Not Recognized???

How to Solve: Tricks & Solutions: Usb Device Not Recognized???: This post is about the frequent problem occuring in our field...sometimes our USB's, Card Reader's,Bluetooth Doesn't Get Recognized by The ...

Wednesday 15 August 2012

Another Alternative to install Turbo C in Windows 7

 Since some users are facing problem installing Turbo C in Windows 7 64 bit using the DOSBox tool. Ignore the that method, instead use this tool to run Turbo C on Windows 7. You just have to download and install this tool. It’s just a simple one click solution to download and install Turbo C in Windows 7.
Download this tool - TurboC Simulator 1.6.5


Google Search Key Tricks

Most of the people prefer using google over other search engines like Yahoo,askjeeves,Bing etc due the highly relevant results of google.Now what to do when even google is not providing you with what you want..certainly you will feel that you have reached the end and there is no way that you can get the type of result you want.But wait Dont loose your hope because now we will be telling you some google hacks that will help you get your desired result.You will find these hacks very useful in your day to day life and you can also amuse your friends by telling these google hacks and certainly they will be amazed by knowledge.


Now Here Are The List Of Google Hacks With Their Usability

Type these searches in google

link:url

This will give the list of sites that links to a particular site.

Example:

link:www.download.com

It will give the list of all sites linking to www.download.com

related:url

This search will give you all sites related to the url you have entered in the above query.

site:domain

This will show all the pages of the Domain you enter in the above query

allinurl:search term

This will show only those results in whose url your search term will appear exactly.

Inurl:search term

This is similar to the query allinurl but it will search only the first word of search term in url and the rest of the words will be searched in the page.

allintitle:search term

This will show only those sites which have your search term in the tittle of website.

Intitle:search term

This will show only those sites which have your first word of search term in tittle and the rest of the words in their page.

spell:search term

This will check your search term for spelling mistakes and automatically perform search in google with correct words

stocks:search term

This will show all the results with your your query in the stock index

filetype:extension search term

This is one of the most useful queries.It will provide you only those sites which provides a document of your extension type and having your search term in it.

Example:

Filetype:doc mother

It will show all doc files in which the mother word is used.This type of search is extremely useful for finding presentations(ppt or pptx) and e books(pdf)

phone:number

This search query will show you the name and address of the number you have entered in the above search.

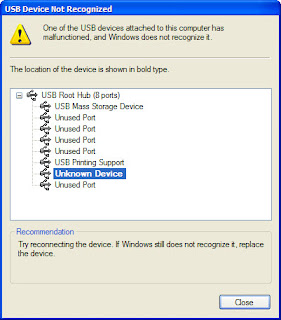
Usb Device Not Recognized???

This post is about the frequent problem occuring in our field...sometimes our USB's, Card Reader's,Bluetooth Doesn't Get Recognized by The O.S.
so here are some of the SOLUTION'S OR TRICKS which i found on the net which might help you..


 So As we all know that the hardware devices have drivers associated similarly USB devices also have it. Sometimes proper drivers do not get detected after the initial installation so reinstallation of the drivers helps resolve the issues.
You may check after uninstalling and reinstalling the USB drivers if you are able to connect. You may disconnect all USB devices and then perform the following steps:
1.     ClickStart, and then click Control Panel.
2.     ClickSystem and Maintenance, click System, and then clickDevice Manager.
Note If Control Panel is in Classic View, double-clickSystem, and then click Device Manager.
If you are prompted for an administrator password or for a confirmation, type the password, or clickAllow.
3.     In Device Manager, double click to expand "Universal Serial Bus controllers", right click on the Host Controller, click "Uninstall" and click "OK".
Check if at all there is an exclamation mark along the driver, it suggests issues with the driver installed.
4.     Repeat the step 2 to uninstall all items under "Universal Serial Bus controllers".
Then, restart your computer and Windows 7 will reinstall all USB controllers automatically.

If This Doesn't Work Then You Can Also Try.. Second Option Which is almost similar but the little difference is you have to uninstall all the unknown devices..

 
1. Open cmd Prompt.
2. At a command prompt, type the following command , and then press ENTER:
“set devmgr_show_nonpresent_devices=1”
3. Type the following command a command prompt, and then press ENTER:
        “start devmgmt.msc”
 4. Troubleshoot the devices and drivers in Device Manager. (**they will be greyed out)
NOTE: Click Show hidden devices on the View menu in Device Managers before you can see devices that are not connected to the computer.
5. When you finish troubleshooting, close Device Manager.
6. Type exit at the command prompt.


Note that when you close the command prompt window, Window clears the devmgr_show_nonpresent_devices=1 variable that you set in step 2 and prevents ghosted devices from being displayed when you click Show hidden devices.


And If this also dont work then you can try another option too..

In this discussion thread there is a procedure as follows:
1. Click “Start”, type “REGEDIT” (without quotation marks) in the “Search” bar and press Enter.
Note: If UAC (User Account Control) pops up, please accept it.
2. Right click “Computer” (the root node) in the left pane, click “Export” under the “File” menu, choose “All” under “Export range”, and select “Desktop”
in the “Save” in box and type backup in “File Name”. Click “Save”.
Note: The backup file is on the Desktop and named backup.reg. We can simply restore the registry by double-clicking the backup.reg file.
3. Click “Start”, type “REGEDIT” (without quotation marks) in the “Search” bar and press Enter again.
4. Locate the “UpperFilters” value under the following key in the registry:
HKEY_LOCAL_MACHINE\SYSTEM\CurrentControlSet\Control\Class\{36FC9E60-C465-11CF-8056-444553540000}
5. On the “Edit” menu, click “Delete”, and then click “OK”.
6. Locate the “LowerFilters” value under the same key in the registry:
HKEY_LOCAL_MACHINE\SYSTEM\CurrentControlSet\Control\Class\{36FC9E60-C465-11CF-8056-444553540000}
7. On the “Edit” menu, click “Delete”, and then click “OK”.
8. Quit Registry Editor and restart the computer.


Of the above 3 solutions i hope one shall surely be useful to you... :)